Most B2B companies use Zoom for hosting live webinars because it’s reliable and works well with marketing tools like Marketo. The native connector between Zoom and Marketo is pretty straightforward – you connect your Marketo program with a Zoom ID, and when someone registers, they get their unique session link through a {{member.}} token.
This setup works fine for single webinars. But when you want to run a webinar series, things get messy fast.
Why Multi-Webinar Registration Matters
Let’s say you’re running a monthly “From Zero to Hero” webinar series about your product. Each session builds on the previous one, so people would to attend all of them.
You send a newsletter promoting the series with links to each individual session. Sounds good, right? Hear John’s case
Meet John: Your Ideal Customer’s Registration Horror Story
John gets your newsletter about your “From Zero to Hero” product series. He’s interested—it’s exactly what he needs to level up his skills. But then the nightmare begins:
Your email is packed with individual links to each session. John has to hunt for the main CTA among all the clutter.
He then finally reaches your main page, but it reads like a blog post with no clear next steps. After scanning the content, he discovers five separate registration links.
John opens five tabs and fills out identical forms five times. Same information, same fields, five different submissions.
His inbox explodes with five nearly identical confirmation emails, each containing different session details.
John now has to open each email individually and add five separate calendar entries – assuming he can remember which email goes with which session.
Fifteen minutes later, with an executive report due and a team meeting starting, John’s thinking your registration process might not be worth the hassle.
How Multi-Registration Should Work
Imagine if John’s experience looked like this instead:
- One focused email with a single, clear CTA explaining the entire series
- One landing page with one registration form that signs him up for everything
- One confirmation email containing all unique session links and calendar save buttons
- One simple process that takes 2 minutes instead of 15
This sounds like magic, but it’s not. It’s totally possible with some creativity and setup work.
Why This Actually Matters
Beyond saving your prospects time and frustration, multi-registration:
- Dramatically increases completion rates by eliminating registration fatigue
- Reduces email deliverability issues by sending fewer, more valuable messages
- Improves attendance rates because people actually have their sessions organized
- Creates a premium experience that reflects well on your brand
- Saves your marketing team time managing fewer campaigns and touchpoints
The Reality Check
Zoom’s native Marketo connector doesn’t do multi-registration by itself. But you can build this with Marketo, Zoom, and Zapier working together.
It takes some setup work, but the results in user experience and registration rates make it worth it. The solution isn’t magic – it just needs some hands-on work to make it happen.
Logic / Framework
To design and conceptualize the framework, we have to make some assumptions and expose the limitations of the platforms we’ll be working with. We find that:
- You can only link one Marketo program to one Zoom webinar.
- Zoom Webinar links are stored in Marketo’s {{member.webinar url}}, being unique for each program and lead.
- We’ll need a main program connected to the child programs, which in these case represent the individual webinars.
- There could be an indefinite amount of webinars, so the process must be scalable.
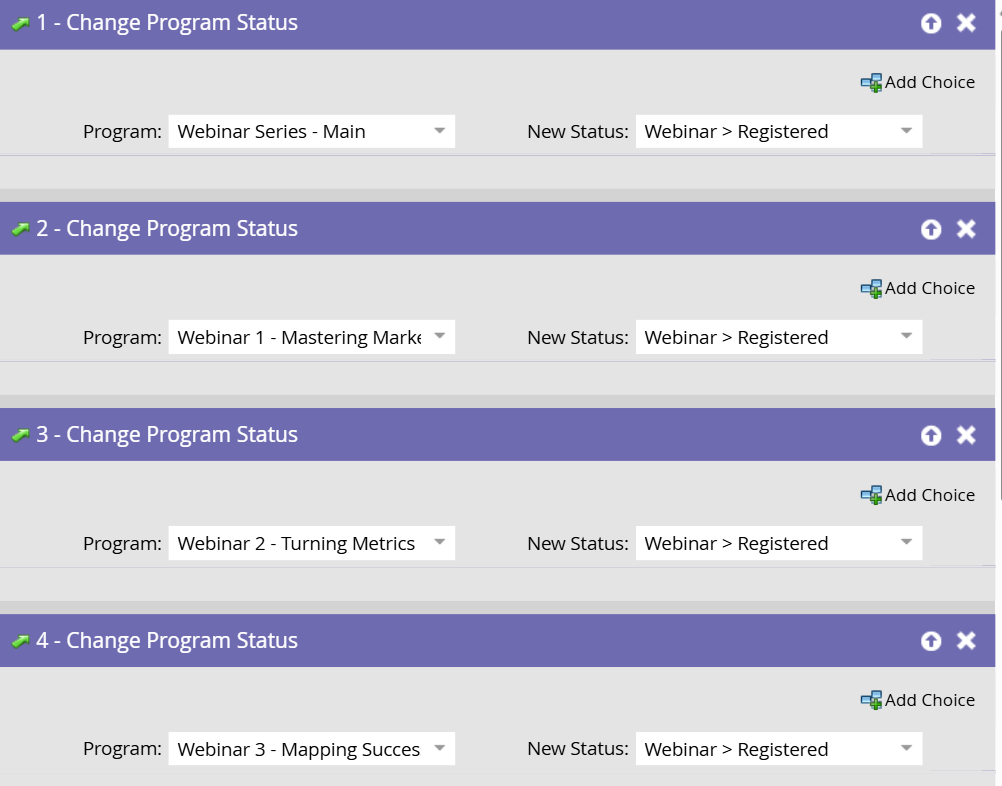
Having every nuance in mind, the challenge here is not to trigger the registration to the child programs, that of course could be achieved by setting up a Smart Campaign that changes the program status of every program once the condition is met.
The technical challenge is to fetch each {{member.webinar url}} from each program, from each lead. (since inside the URL, there’s a unique identifier)
After reviewing numerous options like stamping the webinar URL to Person Fields, to “my.” tokens, or PMCF, I found out the best vehicle to carry out the implementation which would be no other than Marketo’s Custom Objects.
For the email, we will leverage Velocity tokens and Sandford Whiteman’s Agical for the dynamic .ics file.
Understanding Marketo Custom Objects
Custom Objects in Marketo often get overlooked because they seem complicated. But think of them as custom containers where you can store specific information with different fields.
The main difference from other Marketo objects is that Custom Objects need an API to add or edit data. Apart from that, they work like any other Marketo object – you can use them in smart lists, emails, and Velocity tokens.
Creating the ZoomWebinars Custom Object
For this setup, we’ll create a new Custom Object called “ZoomWebinars” with these fields:
- eventUserId: The user’s unique ID for the session
- joinURL: The URL of the session
- personid: Marketo’s Person ID
- eventid: The ID of the session
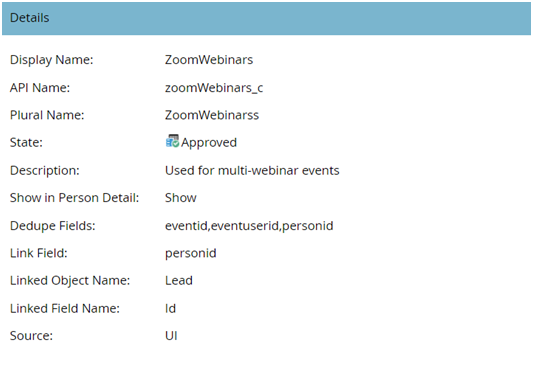
The goal is to store all Zoom webinar registrations in this object. We’ll use these fields later to create calendar files (.ics) and Velocity tokens.
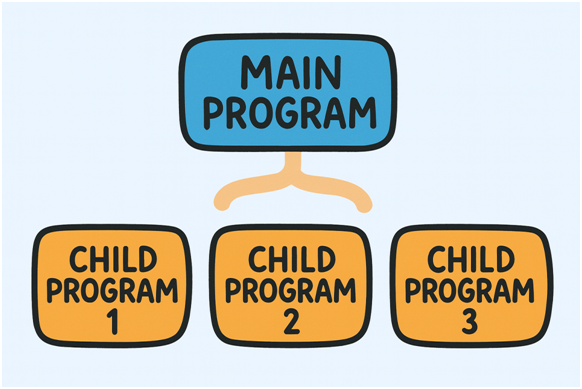
Setting Up Your Marketo Program Structure
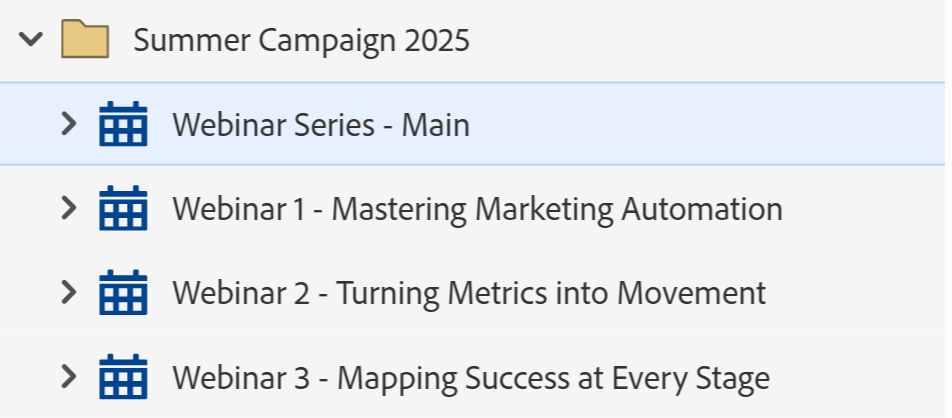
The Marketo structure is pretty straightforward. You’ll have:
1 Main Program: This handles multi-registration through your main landing page
Multiple Child Programs: One for each individual webinar session
The key here is optimizing how emails and registrations work in each program.
How It Works
The main program connects to your main landing page. When someone registers there, they get registered to all the child programs automatically.
After registration, we send one confirmation email from the main program with all the webinar links and calendar buttons.
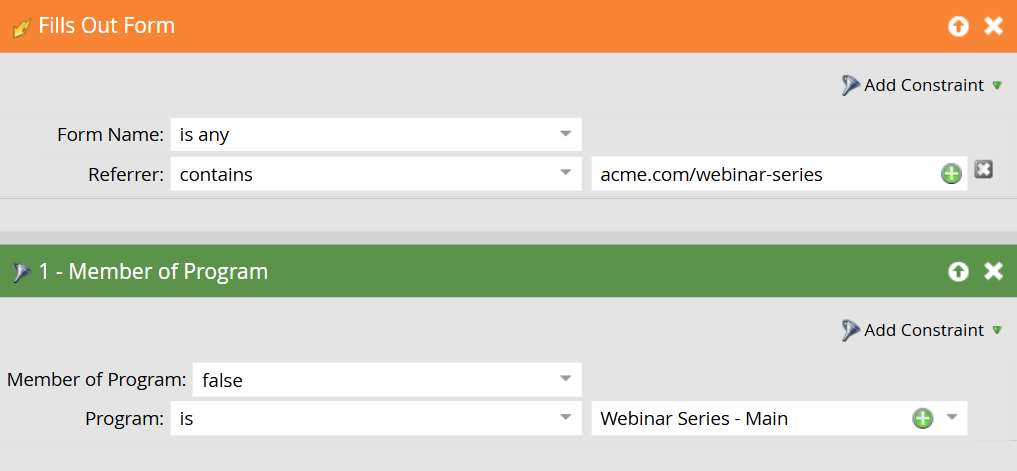
We also keep the individual session registration emails active in case someone wants to register for just one session. To avoid sending duplicate emails when people register through the main program, we add an extra filter to each child program’s registration trigger.
Building the Zapier Workflow
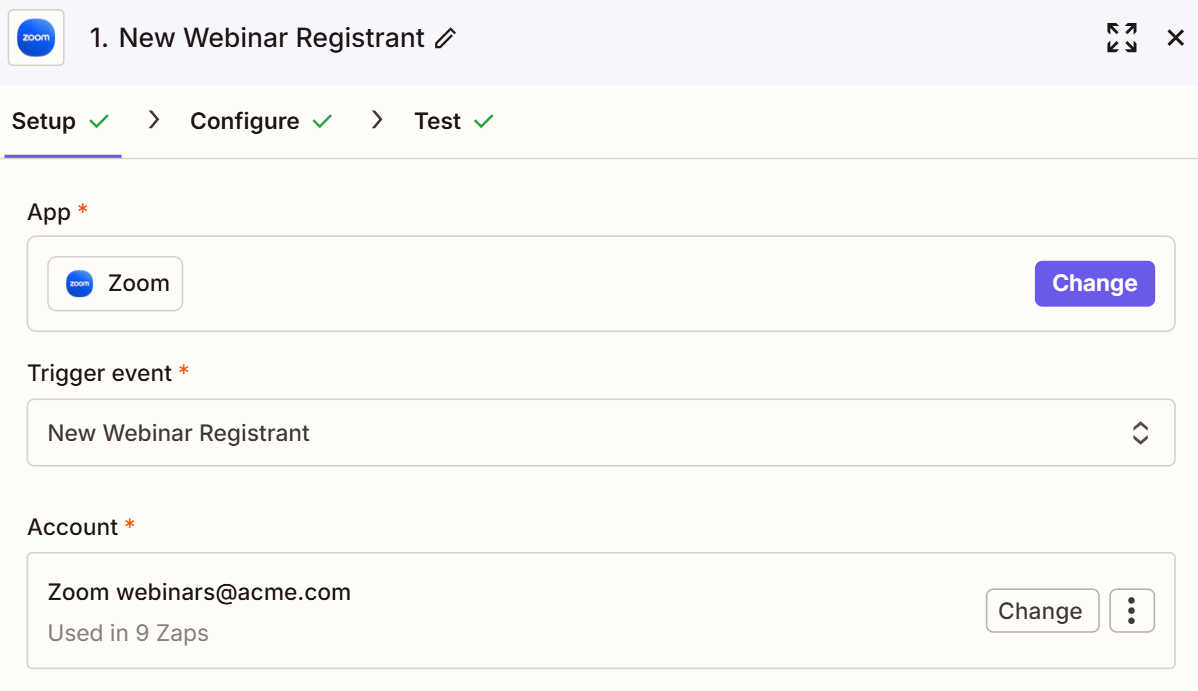
Step 1: New Webinar Registrant Trigger
The first step is setting up a trigger in Zapier that detects when someone registers for any webinar in your Zoom account.
This step grabs important information like:
- Email Address
- Webinar ID
- Join URL for the webinar
When I build Zaps or workflows, I think of them like solving a puzzle where each piece connects to the next one.
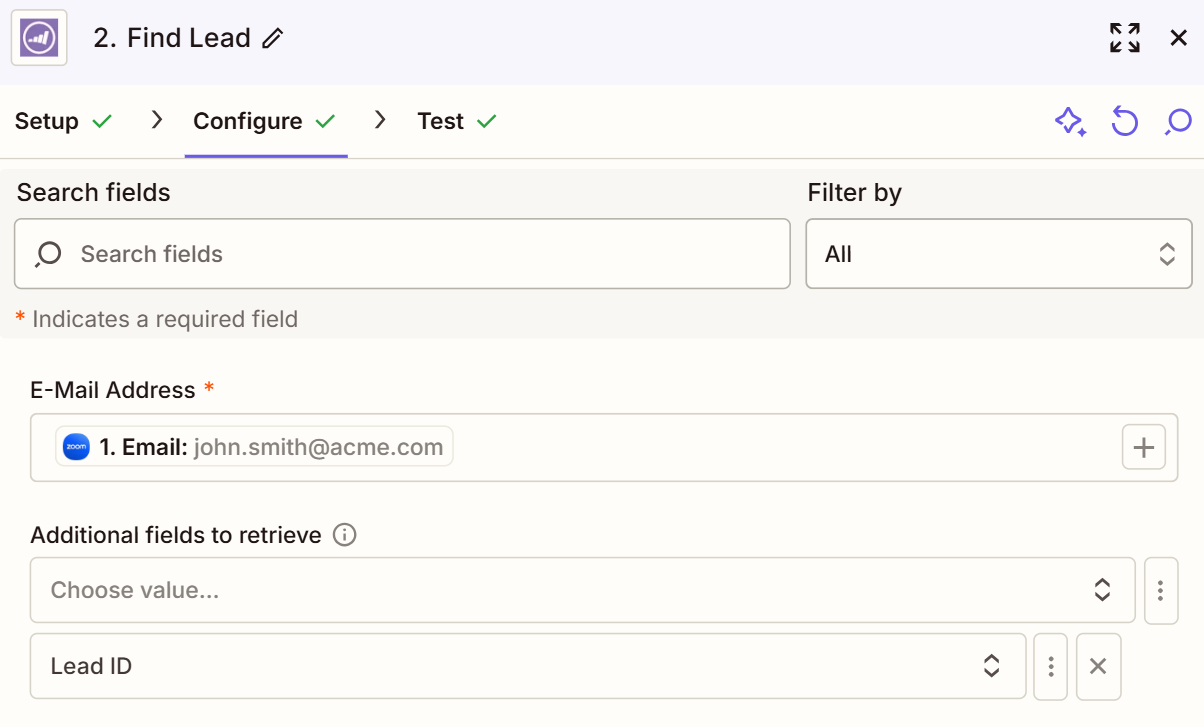
Step 2: Fetch Marketo Lead ID
Marketo’s Custom Object needs at least two deduplication fields, and one must be the Marketo Lead ID.
We get this by using Marketo’s “Find Lead” step in Zapier with the email address from Step 1.
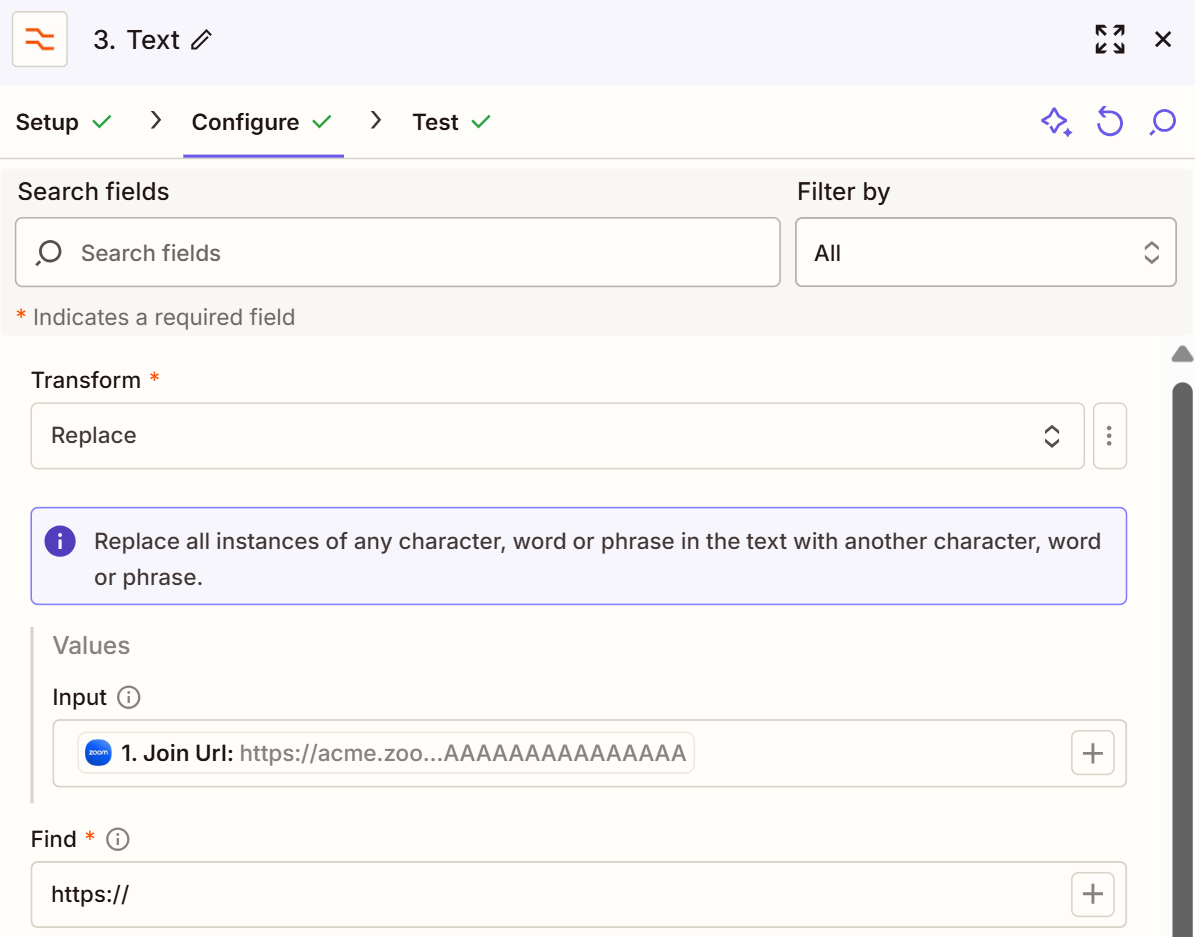
Step 3: Format Zoom’s Join URL
Before creating the record in the Custom Object, we need to remove the “https://” from the Zoom join URL.
I figured this out through trial and error. When you create the record and use it in a Velocity Script, Marketo adds “https://” automatically. If your URL already has it, you end up with “https://https://acme.zoom.com” which obviously doesn’t work.
Step 4: Get Marketo’s Access Token
Next, we request Marketo’s access token using our credentials. This is required for all our API calls to Marketo.
You can find more information about Marketo’s OAuth [in their documentation].
Step 5: Create Custom Object Record
Finally, we create the record for our Custom Object. We make a POST API call from Zapier to Marketo with the URL pointing to our custom object (in this case: zoomWebinars_c).
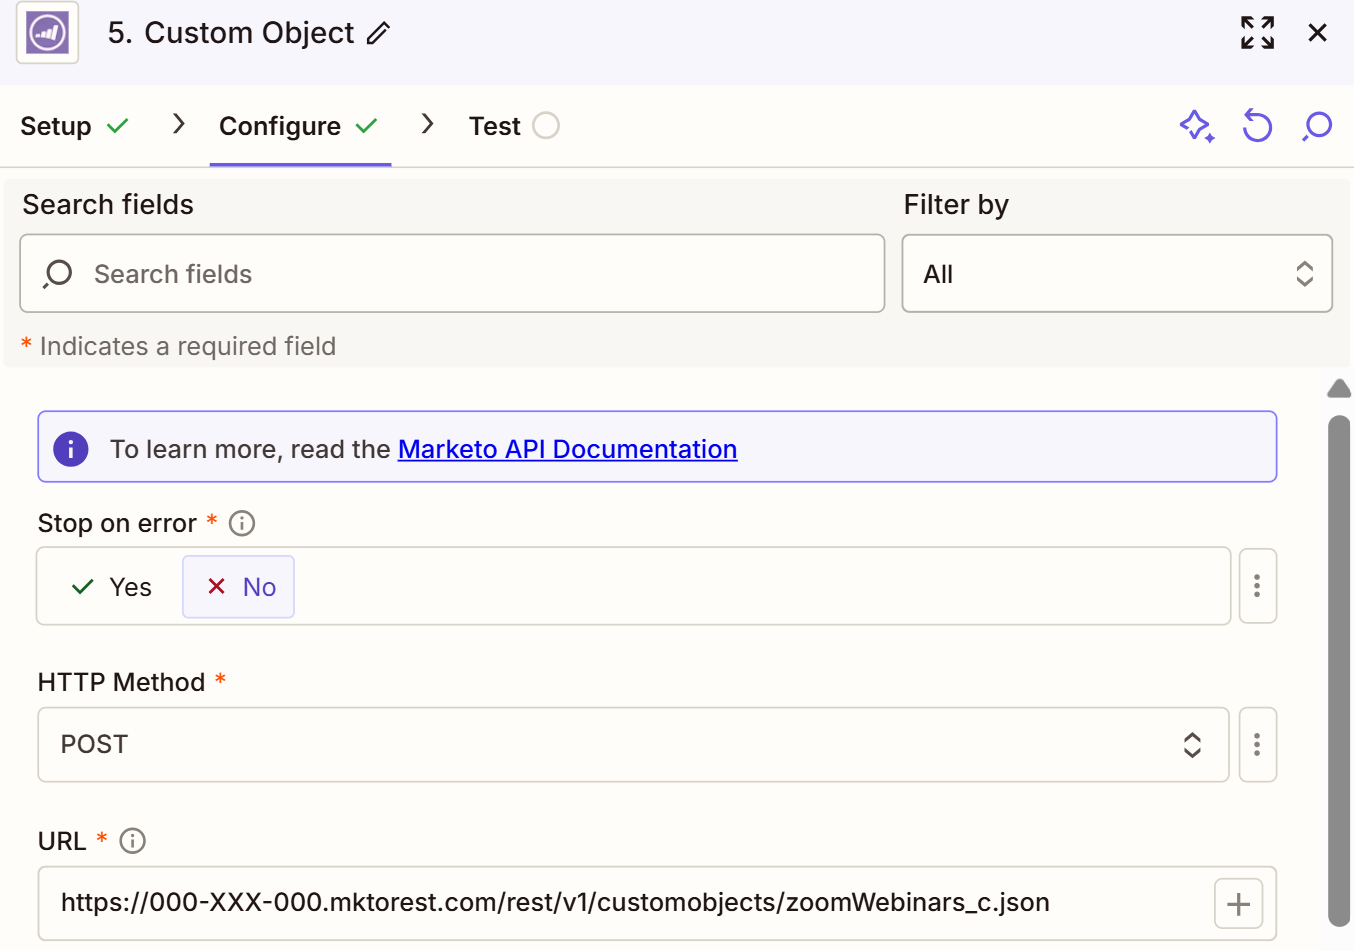
https://000-XXX-000.mktorest.com/rest/v1/customobjects/zoomWebinars_c.jsonAdd Request Headers:
- content-type: application/json

The Body: The syntax tells Marketo we’re creating a record for zoomWebinars_c where we deduplicate leads based on our deduplication fields (eventid, eventuserid, personid). These fields must be unique – no two people can have the exact same combination of these three fields.
Fill the body with:
- eventId: The Webinar ID from step 1
- PersonID: From step 2
- EventuserID: The webinar registration number (deduplication field)
- JoinURL: The unique webinar URL, already formatted without https://
Once this is active, you can see the Custom Object record in the person’s profile in Marketo.

Quick note: Marketo’s built-in steps in Zapier supposedly don’t need access token authorization headers. But I found this isn’t always true – sometimes the access token fails to validate even when it’s still valid in Marketo. That’s why I use a Python script that includes the headers for reliability.
Using the Custom Object in Marketo
Once your Zapier workflow is tested and running, we move to Phase 2: actually using the Custom Object in Marketo.
Custom Objects work in Smart Lists as data sources. But where they really shine is in emails using Velocity Tokens.
Creating Two Velocity Tokens for Each Webinar
Token 1: Access Now
Token 2: Save in Calendar (Outlook / Google)
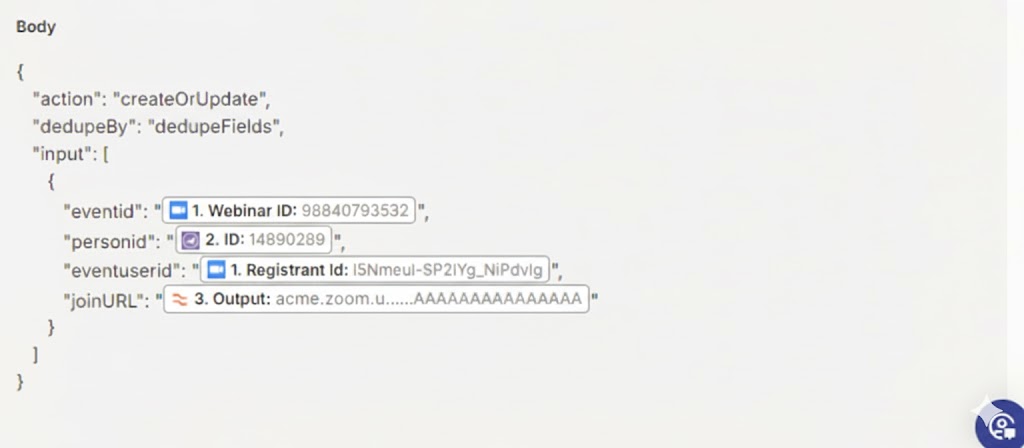
The “Access Now” Token
This token is basically a dynamic button that uses the eventID value to get the correct joinURL from our Custom Object.
I wanted to make this as scalable as possible, so Marketo automatically searches the Custom Object database by filtering through records.
We use the #foreach loop function in Velocity to fetch the joinURL of the eventID. It filters through all results and pulls out the matching joinURL.
Once we have the joinURL, we map it to our “Access Now” link:
#set($eventidList = [0000000000]) ## Change event ID with your webinar ID

#foreach($eventid in $eventidList)
  #foreach($webinar in $zoomWebinars_cList)
    #if($webinar.eventid == $eventid)
      <p>
        <a href="${webinar.joinURL}">Access Now</a>
      </p>
      #break
    #end
  #end
#end
The “Save in Calendar” Token
Adding a custom “Save in Calendar” button in Marketo is tricky because the standard .ICS token doesn’t allow velocity tokens inside the description.
I was stuck on this for over a year. It was a technical challenge I couldn’t solve at the time.
I needed a way to get the correct joinURL from the eventID inside the Custom Object, and put it in the .ICS description along with the webinar title and dates. Then I learned that the best way to solve hard technical problems is through creative solutions.
I found Sanford Whiteman’s Agical solution to create custom .ICS files. I won’t explain how Agical works (check his blog for that – kudos to Sanford for creating such an effective way to work around Marketo limitations).
Our .ICS token will also be a velocity token. You’ll need to replace the highlighted text with your webinar information:
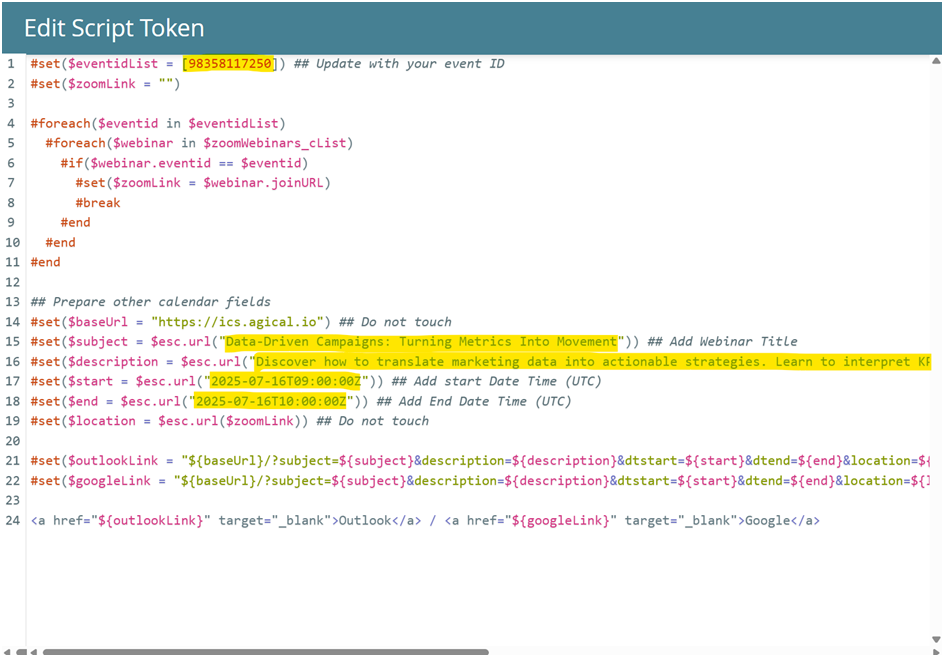
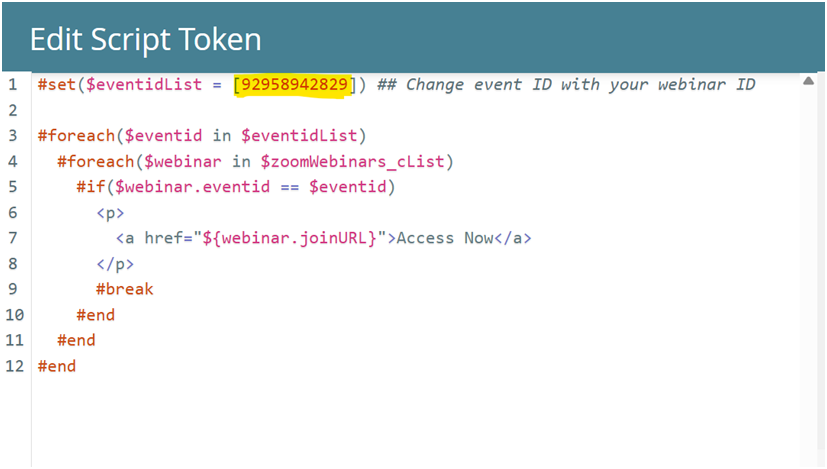
#set($eventidList = [98358117250]) ## Update with your event ID
#set($zoomLink = "")

#foreach($eventid in $eventidList)
  #foreach($webinar in $zoomWebinars_cList)
    #if($webinar.eventid == $eventid)
      #set($zoomLink = $webinar.joinURL)
      #break
    #end
  #end
#end

## Prepare other calendar fields
#set($baseUrl = "https://ics.agical.io") ## Do not touch
#set($subject = $esc.url("Data-Driven Campaigns: Turning Metrics Into Movement")) ## Add Webinar Title
#set($description = $esc.url("Discover how to translate marketing data into actionable strategies. Learn to interpret KPIs effectively and optimize performance.")) ## Add Webinar Description
#set($start = $esc.url("2025-07-16T09:00:00Z")) ## Add start Date Time (UTC)
#set($end = $esc.url("2025-07-16T10:00:00Z")) ## Add End Date Time (UTC)
#set($location = $esc.url($zoomLink)) ## Do not touch

#set($outlookLink = "${baseUrl}/?subject=${subject}&description=${description}&dtstart=${start}&dtend=${end}&location=${location}")
#set($googleLink = "${baseUrl}/?subject=${subject}&description=${description}&dtstart=${start}&dtend=${end}&location=${location}")

<a href="${outlookLink}" target="_blank">Outlook</a> / <a href="${googleLink}" target="_blank">Google</a>
How to Show This in Your Email
The best way to display your webinar series information in the confirmation email is using a table.

Best practice: tokenize as much as you can.
And that’s it! This solution took me a while to figure out – from when I first encountered the problem to finally solving it once I understood how Custom Objects and Velocity tokens work with external integrations like Zapier and Zoom.
Hope you found this useful!