If your organization relies heavily on list imports, you’ll know they’re are slow, manual heavy, and most of the times frustrating.
I believe that all mature organizations with an organized and well structured Marketing Operations department should have at least a system to tackle list imports. There are some organizations that already offer that exact service, a gateway for all your list imports or API syndications, promising zero errors and smooth learning curves.
You could go that way if money is not a problem, since often these external solutions would cost tens of thousands of dollars, but you’d be tied to their intrinsic limitations and wouldn’t be able to adapt quickly to your business needs.
Yet, those solutions are not rocket science since most of the time are based on validation logics that you can customize based on your field schema and layout.
So… what’s the catch?
I’m gonna be honest, I don’t have a coding background, nor I know about system infrastructure, but I do know how things work, the process logic from start to end and what the team and the business needs to work faster.
It’s not about jumping the wall, it’s how you get around it.
So, I decided to create a List Import Application to help me and the team to overcome the pain that are list imports, while also adapting to the business needs. The end result was a fully functional web application that mixed an straightforward UI with the intrinsic power of n8n’s automation.
What were the results after it? Not only helped us to reduce the time spent in list imports by 90%, it’s a living app able to quickly adapt to business needs which makes it convenient for fast paced companies.
List Import Challenges
First of all, let’s disclose common list import challenges:
- They’re manual heavy, from list review, QA and submission.
- Users have to review each row looking for possible errors, these lists often have +100 rows making it extremely time consuming.
- Marketo is limited to .csv files and sometimes would have trouble reading it.
- In case there’s any formatting error, you’ll need to parse it, clean it, and submit it again.
- List Imports only allow one status per upload ,and program per upload.
- No flexibility if there are any special rules, what if we need to route leads to different programs on round-robin rules?
The list could go on. These are the challenges I faced every week, which made the process feel old, rigid and punishing which was my main motivation to build the best product I could.
List Import App Features
This project is currently hosted on Vercel, which leverages vibe-coded code from my personal Github. Vercel is then connected to n8n via a simple webhook POST request.
So you could see the project divided in 2 parts: List Import Validation and Submission
List Import UI
The first thing you’ll see is are some basic instructions on all the different features of the app and your usual file attachment module to add your list.
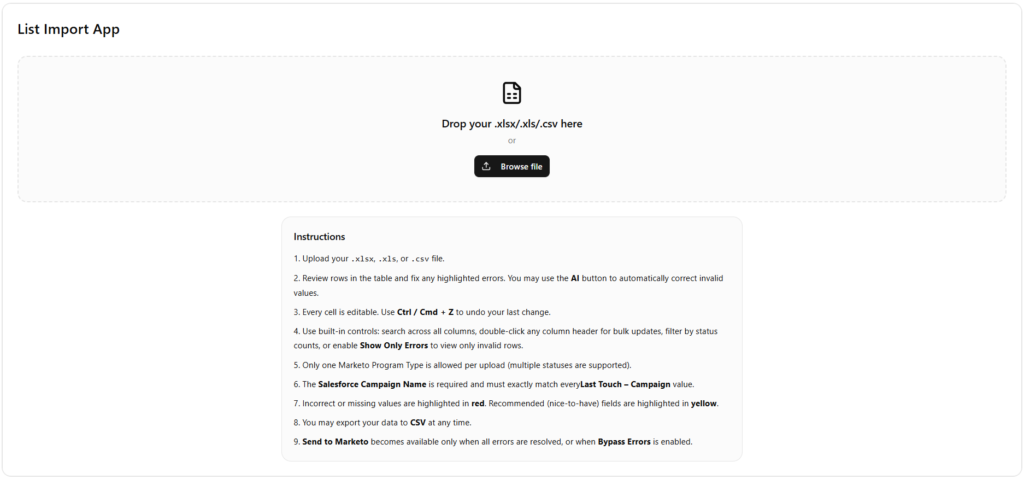
The file attachment is extension flexible, allows the most common list formats like CSV, XLXS, or XLS.
Once the list is uploaded, a new menu appears:
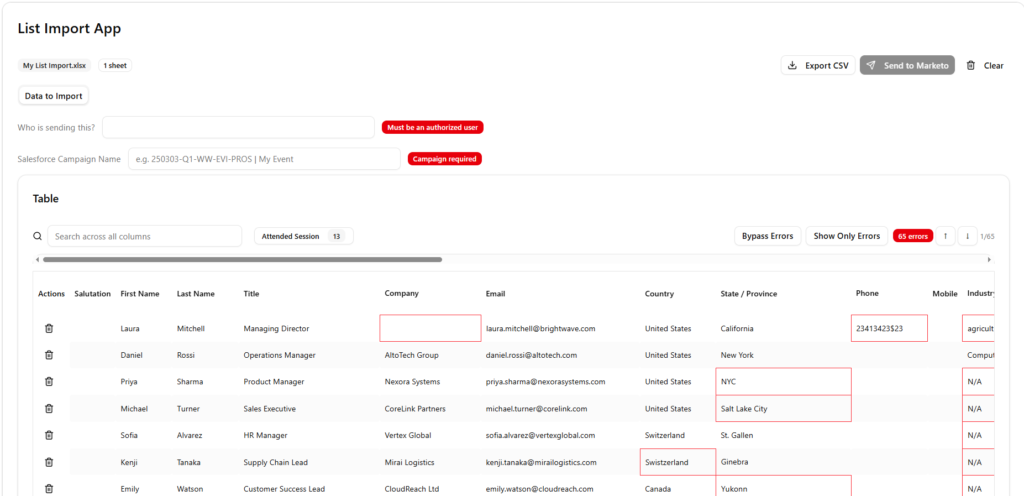
This menu is your main workstation, the layout is divided in 2 main parts, the header (1) and the table (2)
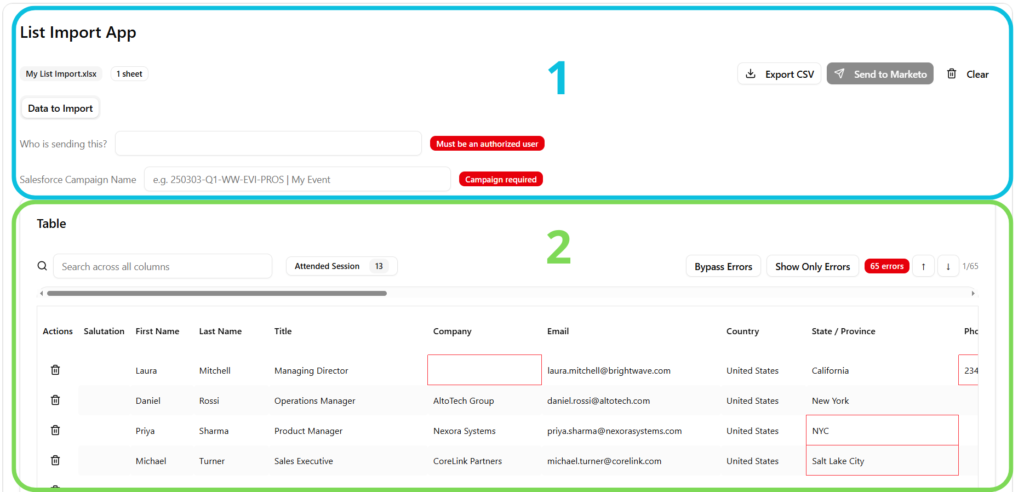
Header
The header is simple and contains some valuable information. Navigation across sheets is possible, and the upload will only trigger to whichever sheet you’re on. Moreover, two key fields take place:

- Who is sending this? This is basically our security validation, which prevents unwanted users from accessing our API. Simple, but effective.
- Salesforce Campaign Name: This will be the destination of the list import, where it’s headed and our source of truth. By default, Marketo names should mimic Salesforce ones.
By default, the “Send to Marketo” button will be greyed out till there are no errors or the Bypass Errors button is active (more on that below).
Additionally, the app allows you to export the current list as a CSV file. In case you want to restart, there’s a “Clear” button.
Table
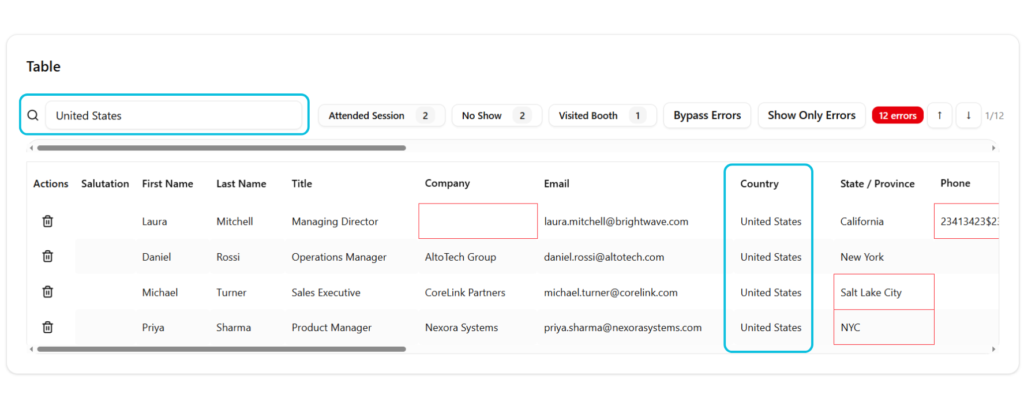
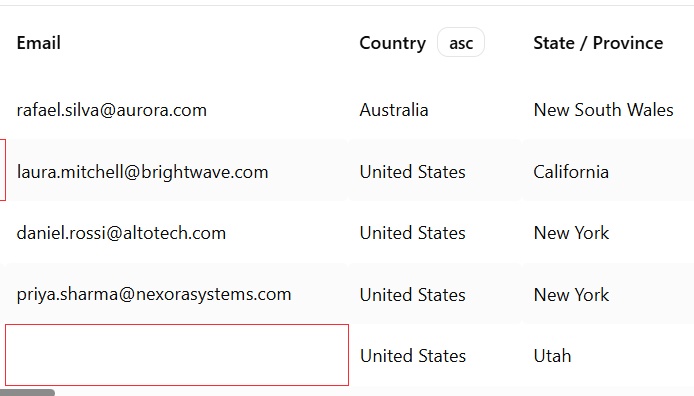
The main component of the app is the validation table, which is in essence your list but on steroids.
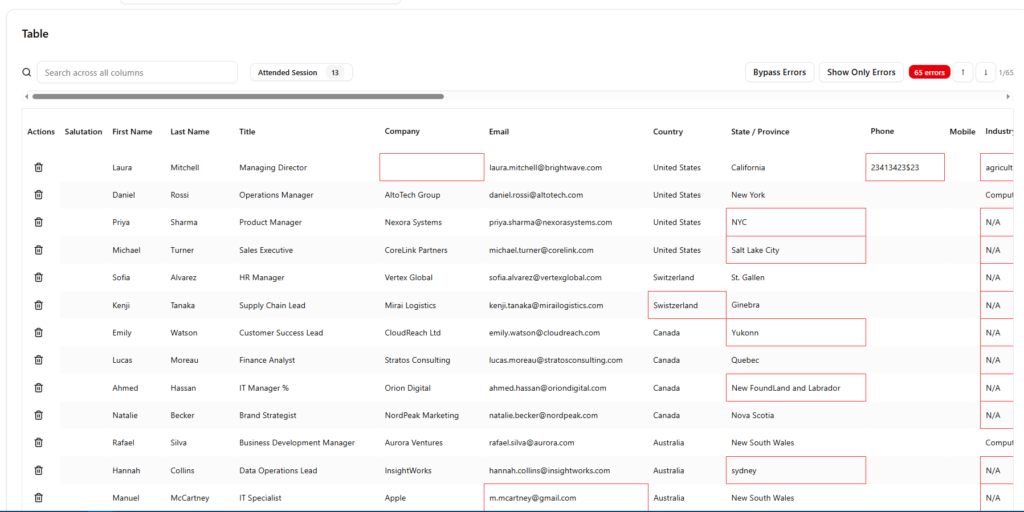
The app will mimic the file and highlight in red all formatting errors based on your internal rules, which stops you from squinting at spreadsheets trying to find possible errors.
All cells are editable, allowing real-time editing just as Excel would allow. You can click into any cell and fix it right there, and if you make a mistake, the app allows to undo changes by hitting Control + Z.
For fields that are defined as picklists, the application presents a list of allowed values. Users must select from these values to ensure that the data is accepted by downstream systems and respects internal rules.
Features That Actually Save Time
Search and Filter
At the top of the table, a search bar allows you to search within the list. When a term is entered, the application searches across all cells and shows only the rows that contain the searched word or phrase. This search works across all columns, making it easier to locate specific records or patterns without manually scanning the entire table.
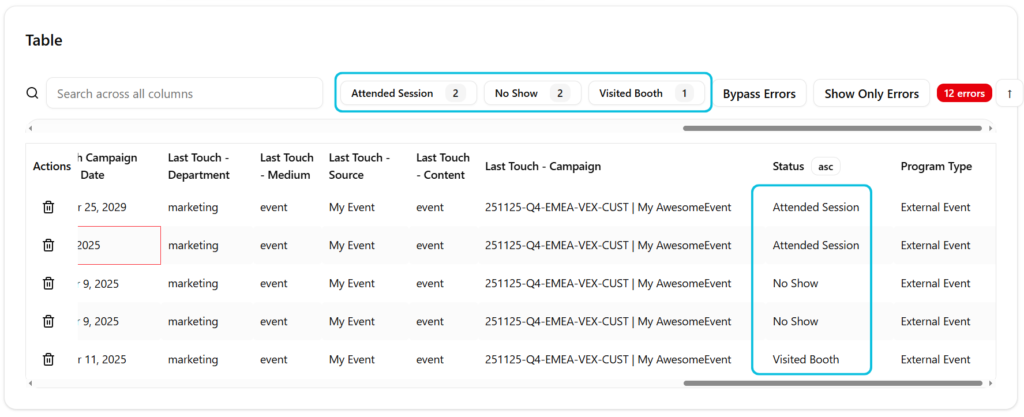
Program Status Count
Next to the search bar, the interface shows the number of people that have a given program status. This helps users keep track of how many records are in each status category before sending the list.
Just your simple sanity check.
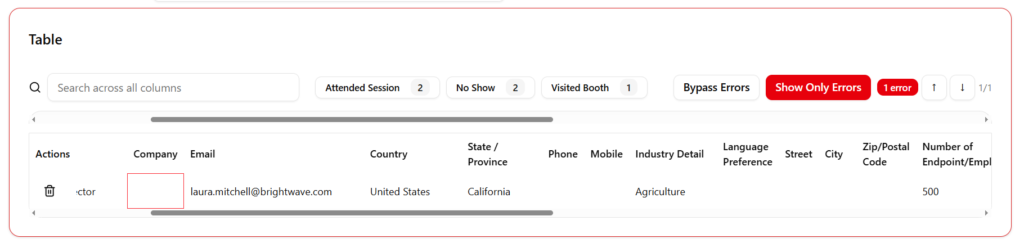
Show Only Errors Mode
This is particularly helpful for large lists with more than 100 or 1,000 rows, where manually searching for errors would be inefficient.
Once the button is clicked, the borders will turn red and you’ll only see the rows that have issues, making it easy to spot the rows with errors.
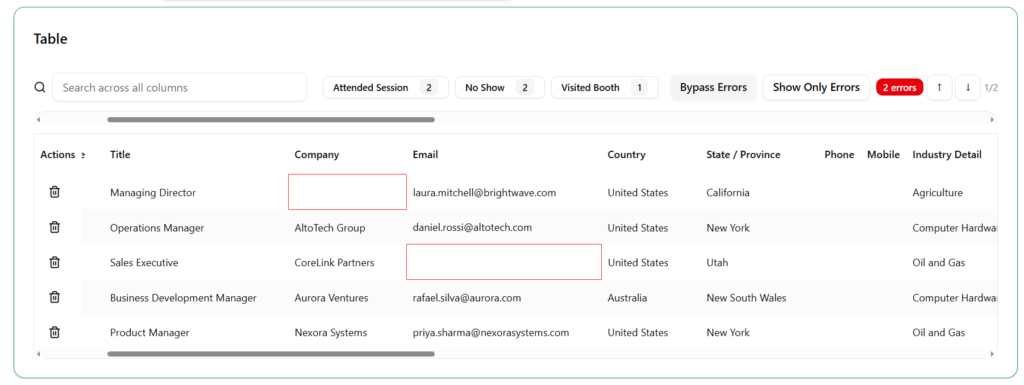
Bypass Errors Mode
In some exceptional cases, you may need to send a list to Marketo even if some errors remain. For this, the application offers a bypass errors mode.
When the bypass errors button is clicked, the borders of the table turn green, indicating that the mode is active. In this state, the application allows sending the list to Marketo even if validation errors are still present.
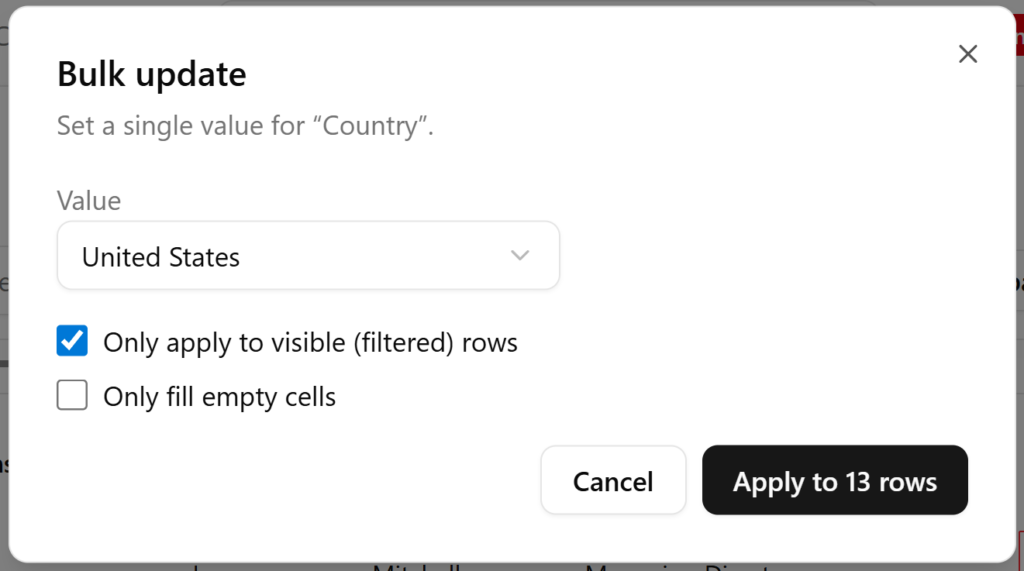
Sorting and Bulk Updates
Each column header supports sorting and bulk updates.
One click will sort alphabetically.
Double-click allows to bulk update the entire column with a single value.
The AI Cleaning Button
For certain fields, especially those with picklists like country or state, the application provides an AI button that connects to OpenAI to help clean invalid values.
When a picklist field contains an error, you can click the AI button. Then, the current value is sent to ChatGPT, which attempts to match it against the allowed picklist values, taking into account the context of the field.
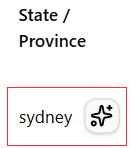
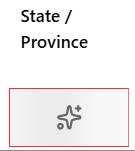

This is useful when there are many different incorrect inputs that are not suitable for a simple bulk update.
How to Upload them to Marketo
n8n is the automation platform used for this project, but of course you can use any other similar apps, or your own code. The workflow is somehow complex and long, but I’ll try to explain the essential steps.
Why I used n8n is for convenience since processing X amount of leads only costs one execution compared to other platforms where each step is a token. So if we were to process 100 leads, we’d be tied to the amount of steps it takes a lead to process multiplied by the amount of leads… making it costly.
The Connection: Vercel to n8n
The connection between the app and n8n is fairly simple as it’s a normal API Post request made from Vercel to the workflow. The whole table will be sent to n8n and appear as a JSON array in which we’ll need to split out the leads so each of them is processed individually.

Assume that every row in the table is an object of the leads array, the columns are the label names, our Marketo names. To split them out we’ll select the array, something like body.records.
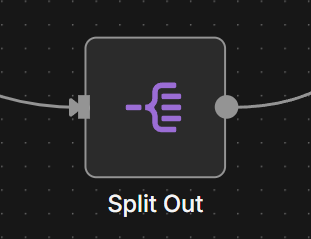
Step 1: Check if the Campaign Exists
After we do the split, we’ll check whether the Campaign Name already exists in Marketo by simply referencing it from the original payload. It’s recommended to URL encode the name in a prior step to prevent any odd characters.
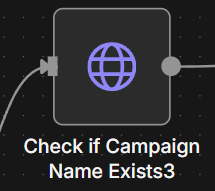
In case it doesn’t exist, we’ll have our own AI agent called Marketo Expert who will clone and move the Marketo program by its own, while also activating attribution smart campaigns along the way.
This agent already has the IDs from the templates and the active folders. Based on the naming convention, it’ll be able to decipher what template to clone from, and where to put it.
Step 2: Deduplicate the Leads
Next, the leads need to be vetted to know whether they’re duplicated or not. This is important since the dedupe field used to upload the leads is the email.
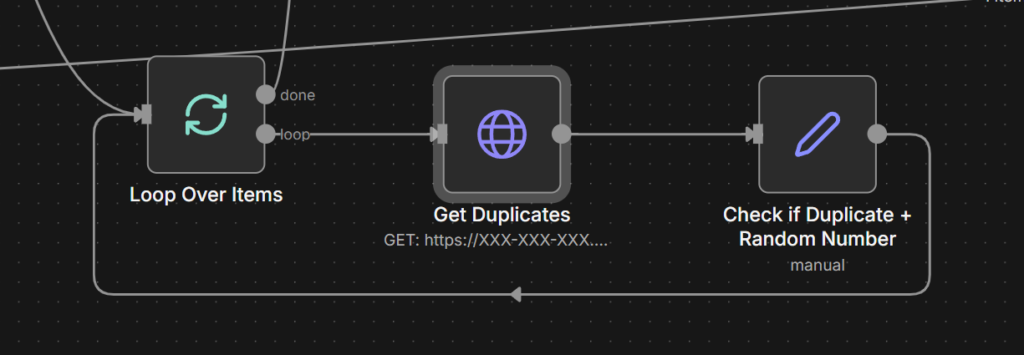
Would we skip this step, duplicate leads would make the upload fail and stop since their email would be the same. For those, we’ll be referencing their SFDC ID focusing on Contacts and Created Date as tie breakers.
Inside the loop, we search for every lead by their email, and then extract their SFDC ID and Created Date. Additionally, in case the search outputs 2 items, the system will mark it as duplicate.
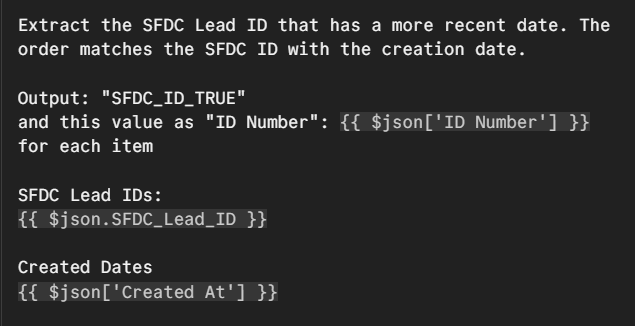
Step 3: The Random Number Tie Breaker
Last part involves adding a random number to the lead. This may sound weird at first, but it’s a vital tie breaker in the remote case it’s a duplicate and SFDC lead at the same time.
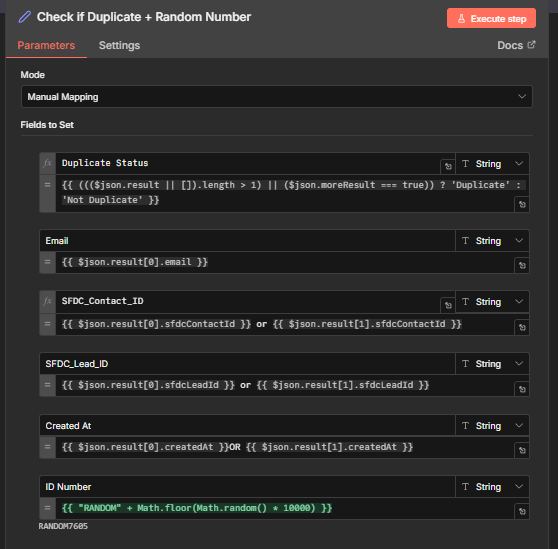
In that case, the ID Number allows us to quickly identify the SFDC in a subsequent AI step that selects the ID number with the highest value.
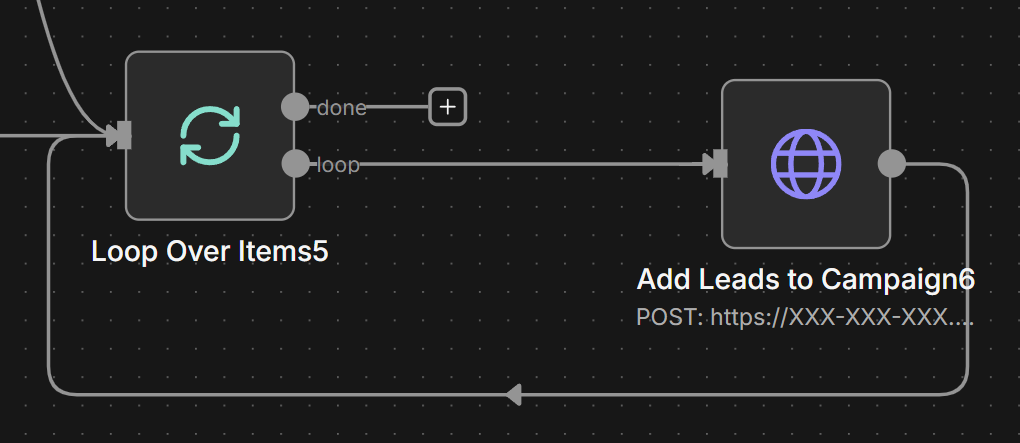
Step 4: Upload to Marketo
Finally, resulting leads will upload to Marketo to the matching program and with the appropriate program status. Beware of the API limit of 10 calls per request, 100 calls per 20 seconds. You could either max the 10 calls and add a mandatory wait step, or add them one by one which is what I personally do without the need of adding an extra wait step.
Final Thoughts
You don’t need a coding background to build tools that solve real problems. You need to understand the problem deeply, know what the team needs, and find the right tools to piece it together.
If your team is still manually reviewing list imports row by row, it’s time to build something better. Or at the very least, stop accepting that pain as just “how things are done.”
Thank you if you made it this far, I’d like to reward you with a small scale mock up so you can test the different features except API / webhook ones.
Cheers,