If you’re working with Marketo, or really any platform that enables email sends, it’s crucial to tailor and personalize the message to your specific audience. In this post, we won’t be focusing on the message itself but rather analyzing their past behaviors and predicting when they’ll be more likely to open one of our emails.
To accomplish this automation, I’ll be using n8n, which is a low-code iPaaS automation platform capable of running custom API connections, custom code, AI nodes, and more.
0. Prerequisites
Before implementing this workflow, there are some essential prerequisites I recommend having in place before starting:
- At least 1 year of email activity in your database
- An iPaaS platform like n8n, Zapier, Make, etc.
- Marketo Admin access
1. Trigger Configuration
For this flow, I decided to use a manual trigger since it’s what works best for me and provides the most control over when the process runs.
2. Marketo Setup
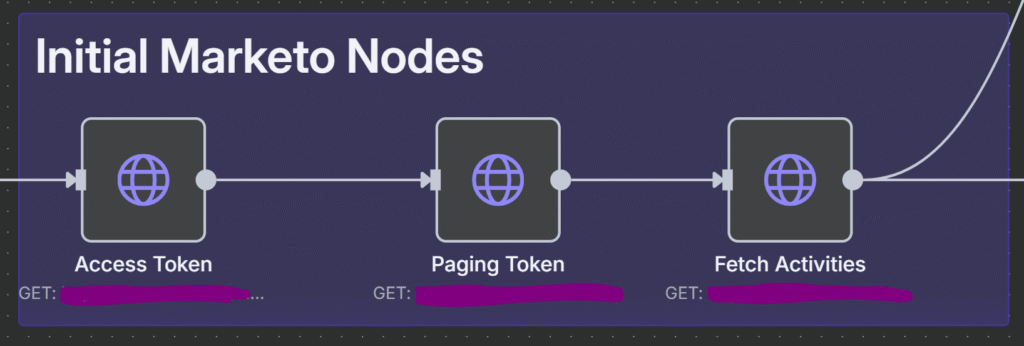
2.1 Access Token
To extract the access token, you’ll need a series of credentials:
- HTTP Method: GET
- API URL:
https://123-ABC-456.mktorest.com/identity/oauth/token - Parameters:
grant_type: client_credentialsclient_secret(from Launchpoint)client_id(from Launchpoint)
Note that grant_type, client_secret, and client_id are all query parameters.
To fetch your unique client secret and client ID, you’ll need to create a new API user, then navigate to Launchpoint and click “View Details”.
Process: Create new API user → Launchpoint → Create new service → Click on view details
A typical complete query would look like this:
https://123-ABC-456.mktorest.com/identity/oauth/token?grant_type=client_credentials&client_id={{client.Id}}&client_secret={{client.secret}}Once we have all the credentials, we’ll fetch the access_token, which is only valid for 1 hour. This access_token will serve as our key to call the subsequent Marketo API URLs.
2.2 Get Paging Token
The next step is to obtain the pagingToken. This token represents the date from which we’ll start fetching activities from the Activity Log.
- HTTP Method: GET
- API URL:
https://123-ABC-456.mktorest.com/rest/v1/activities/pagingtoken.json - Query Parameter:
sinceDatetime(yyyy-mm-ddThh:mm:ssZ date in ISO format) - Header Paramenter
- Authorization: Bearer {{access_token}}
The sinceDatetime parameter serves as another query parameter that establishes the starting point for when we begin fetching activities. In my particular case, this was January 1st, 2024 (2024-01-01T00:00:00Z).
It’s important to note that the access_token must always be placed in the “Header” section, where the header name is consistently “Authorization” and the value follows the format “Bearer {{access_token}}”.
A typical complete query would look like this:
https://123-ABC-456.mktorest.com/rest/v1/activities/pagingtoken.json?sinceDatetime=2024-01-01T00:00:00ZThe end result should be something similar to this: 4FQHFMMI3AG4UOACHHMQH3VA3VXA62ERCOSJ6IBA57LWJUH3HDBQ====
2.3 Activity Type IDs
While this step can be completed manually by calling the API URL, modern AI tools like ChatGPT can now provide the ID for Marketo’s Activity Types. Here are the most important ones you’ll need:
- ID: 1 – Visit Webpage
- ID: 2 – Fill Out Form
- ID: 3 – Click Link
- ID: 6 – Send Email
- ID: 7 – Email Delivered
- ID: 8 – Email Bounced
- ID: 9 – Unsubscribe Email
- ID: 10 – Open Email
- ID: 11 – Click Email
- ID: 13 – Change Data Value
- ID: 104– Change Program Status
2.4 Fetch Activity Data
After completing the previous steps, we’re now ready to fetch the activities. In this case, we’ll focus on the “Open Email” activities using the following API request:
- HTTP Method: GET
- API URL:
https://123-ABC-456.mktorest.com/rest/v1/activities.json - Query Parameters:
activityTypeIDs: 10nextPageToken(Reference from our Paging Token step)leadId(Optional – use only if you want to fetch from a specific record)
- Header Parameters:
- Authorization: Bearer {{access_token}}
https://123-ABC-456.mktorest.com/rest/v1/activities.json?activityTypeIds=10&nextPageToken=ABC123XYZ&leadId=12354Once we execute the API request, we’ll receive a comprehensive dataset including the campaignId, leadId, activityDate, primaryAttributeValue, and more. However, it’s specifically the activityDate and leadId fields that we need to capture and store.
Important limitation: There’s a restriction of 300 activities we can fetch per single API call. Consequently, if there are additional activities in the system, the moreResult field will equal “True” alongside a new nextPageToken.
This essentially means we need to create a loop that continues to reference the new nextPageToken while moreResult equals “True”, until it no longer does.
3. Process Activities and Send to Spreadsheet
The approach for processing the activities is straightforward: simply upload them to a spreadsheet with the columns leadId and activityDate.
Why this approach? The optimal method for later uploading all this data into Marketo is through list imports. Using API calls would consume excessive resources. For reference, my workflow ultimately generated 300,000 rows.
I utilized Google Sheets for this process, though Excel and other spreadsheet programs work equally well.
In the Google Sheets node, simply configure it to “Append Row”, then reference your leadId and activityDate fields.
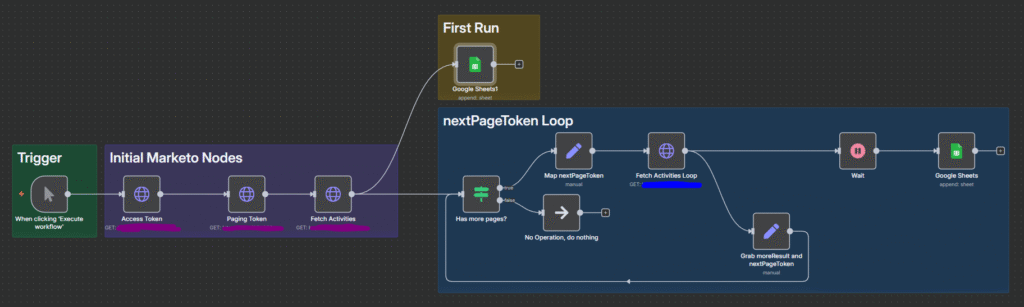
4. Design the Loop for Pagination
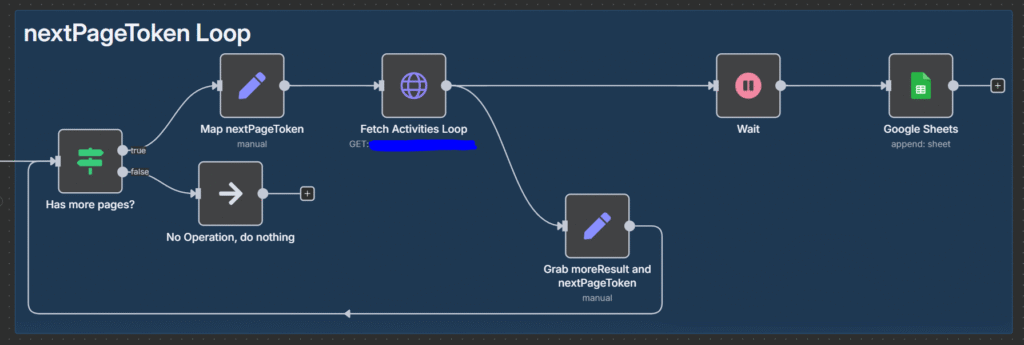
As mentioned previously, we need to design a loop that continues running while moreResult equals “True”.
Rather than using n8n’s native Loop node, we’ll create one from scratch by leveraging the “If” node with the condition "{{$json.nextPageToken}} is true".
The key insight here is that the token references the most recent nextPageToken from the previous step, not a specific one from a particular node.
Next, we’ll add an “Edit Fields (Set)” node to map the nextPageToken and fetch the activities in Marketo using the token from the fetch node before the loop.
After retrieving the activities, we can then map them to our Google Sheets spreadsheet following the previous steps, and map the nextPageResult once more. In this case, we’ll also map the moreResult to a custom field.
This moreResult field will be referenced in the “If” node, which will restart the loop if the value is “True”.
Pro tip: I recommend adding a wait step each time we trigger the spreadsheet node, since there’s a limited number of calls we can make to the node within a one-minute timespan.
5. Analyze All Activities with AI
The final result should be a spreadsheet containing at least two columns: leadId and activityDate.
We’ll then export the spreadsheet as a CSV file and let AI identify the preferred time for each lead based on the leadId and the average of open times.
I used Gemini 2.5 Pro since it offers the largest token window available in the market currently. Given that I had approximately 300,000 rows in my spreadsheet, using this model was essential.
Here’s the prompt I used – feel free to adapt it to your specific needs:
**CONTEXT**
You’ll receive a large spreadsheet with only 2 columns. Within it, you’ll find numbers which represent leadId, followed by a date/time in ISO UTC format that represents the exact moment they opened an email.
**INSTRUCTION**
Based on the date/time for each lead, I need you to extract the most frequently repeated open time for each lead in 30-minute intervals (24h clock format, e.g., 10:30, 17:00, 20:00, etc.) and convert to UTC+2.
If there are times that vary significantly from each other, prioritize the earliest one and the most recent date (given that today is {{current.date}}).
Examples:
- If a lead has 12:32 and 12:56, the most frequent open time is 12:30
- If a lead has 12:28 and 12:32, the most frequent open time is 12:30
- If a lead has 12:03 and 11:58, the most frequent open time is 12:00
Do not skip any lead.
**OUTPUT**
You should output 2 columns: the leadID and the “Most Frequent Open Time” (hh:mm). Ideally, output this as a CSV file.
The end result is a new spreadsheet containing the most frequent time for each lead. Make sure to double-check for any potential AI hallucinations – in my case, there weren’t any issues.
6. Implement Best Send Time in Marketo
To implement the best send time in Marketo, the first step is creating a custom field in Admin with “String” type.
Once you have this field, you can choose between two approaches:
- Use a POST API to upload the list (leadId is sufficient to identify the lead in API calls)
- Cross-match the leadId with email addresses
I chose the second option. For this approach, simply download a smart list with “Opened Email” using the same timeframe you used in the API call.
Download the list and merge it with the AI-generated list. You should then add an Excel function to match the leadIds and extract the corresponding email addresses.
I used ChatGPT to assist with this task and developed an INDEX formula that perfectly met my requirements.
After you’ve matched the emails with their preferred times, perform a list upload to a newly created static list, and you’re finished.
7. How to Apply Best Send Time
I typically leverage this field in smart campaign email sends, where I add the “Send Email” step with a constraint. The constraint uses the Best Send Time field we created earlier, with the value matching the time I’m planning to send.
Subsequently, I apply a wait step of 30 minutes or 1 hour (depending on how granular your field is) and repeat the constraint with the accurate value 30 minutes/1 hour in the future.
You can either focus on the 2 hours following your initial send time, or map out the entire day – it depends on how comprehensive you want to be with your approach.